最近阿里刚刚开源的weex觉得很不错,因为类似vue的双向数据绑定、组件化让我能很快的上手,另外 weex 的特性使得我这种不会android、ios开发的人也能快速也出一个app。 但是因为是刚刚开发,所以肯定有很多地方是有问题的。但是这绝对拦不住我踩坑的热情,哈哈哈哈。。。
我在使用的weex 的版本是 0.6.3 ,在这个版本中还是有很多在web 页面支持的html、css 特性在weex 中是不支持的,比如我在想做一个app过程中用到一个类似单选的组件是没有的,所以我就想着自己实现一下。
首先对于weex技术来说,经常会遇见三个名词,而且经常容易混淆。首先是weex-toolkit,在Android代码中,无法直接加载.we文件的,但是可以加载.js文件的,所以我们需要把.we文件转换成.js文件,Weex给我们提供了一个工具weex-toolkit。这个是个帮助快速初始化项目、运行热部署的工具其中会有weex的代码,这里的weex-toolkit 的版本和weex的版本是不一样的。更新weex-toolkit 并不能更新weex 的版本,若是想要更新weex版本可以在android中更改配置文件重新编译运行。另一个是 weex-pack 这个是帮助快速初始化项目以及打包成apk的工具。
环境及运行
要使用weex 必须要先解决环境安装问题,这些阿里团队都做好了只要安装几个包就好了。
在 Node.js command prompt 下面
更新npm, cnpm cnpm install -g cnpm
安装 node-gyp cnpm install -g node-gyp
安装 weex-toolkit cnpm install -g weex-toolkit
前两步是用来更新环境,若是之后的weex-toolkit 出现问题,有可能是你当前的node、npm、node-gyp版本太低了,具体版本支持去看weex-toolkit就好啦。
在手机上 安装playground ,用来扫描之后生成的二维码。
在空文件夹下 创建自己的myRadio.we文件
在上步的文件目录下在命令行中 输入 weex myRadio.we 即可以启动 服务器及热部署在浏览器中。
想部署在手机上 启动weex myRadio.we –qr 然后会生成二维码 ,在手机上打开weex playground 扫描二维码就可以看到效果了。
若是扫描二维码出现’network error’可以按下面几步来查看问题:
最重要的是确保手机和电脑在同一个局域网中
最好关掉翻墙软件、关掉防火墙
若是有打开虚拟机最好也关掉,否则会造成ip 不一样
可尝试ping 手机ip 保证手机电脑是相互连通的
第二种快速运行的方式:
建立一个空文件夹 ,在空文件夹中运行 weex init
然后 npm install
运行 npm run serve
第三种快速运行的方式:
安装 cnpm install -g weexpack
weexpack init projectName
之后运行时 weexpac run android
实现单选组件
单选组件的实现
想要实现的组件的功能就是html 中单选的功能:一堆选项可以选其中的一个。 功能效果如下
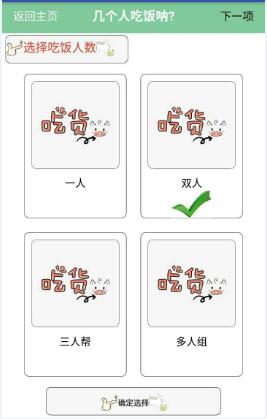
一堆选项的 样式是相同的,所以就可以写成一个radio组件,然后在点击的时候能够知道 是点击了哪个就可以了。 在这个过程中会用到父子组件的通信。因为会将子组件的点击消息发送给父组件,因为会在父组件中使用点击的消息。 先看代码实现吧,一看其实就明白了。。。
1 2 3 4 5 6 7 8 9 10 11 12 13 14 15 16 17 18 19 20 21 22 23 24 25 26 27 28 29 30 31 32 33 34 35 36 37 38 39 40 41 42 43 44 45 46 47 48 49 50 51 52 53 54 55
| <template> <div class="container"> <image class="a" onclick="clickevent($event)" src="{{bgimg}}" index="{{index}}" flag="{{flag}}"> <text style="font-size:30;">{{text}}</text> <image class="icon-ok-flag" src="{{okSrc}}" if="{{flag}}"></image> <image class="icon-blank-flag" if="{{!flag}}"></image> </image> </div> </template> <style> .container{ font-family: Microsoft Yahei; border-width:1; border-radius:15; margin:20; } .a{ border-width:1; border-radius:15; width:250; height: 250; justify-content:center; align-items:center; margin: 20; } .icon-ok-flag{ width:120; height:80; } .icon-blank-flag{ width:120; height:80; } </style> <script> module.exports = { data: { bgimg:null, index:null, text:null, flag:false, okSrc:'http://d2.freep.cn/3tb_16122215573816yt581069.jpg' }, methods: { clickevent:function(e){ this._parent.$emit("notify",{ index:this.index }); } } } </script>
|
在上面中class 为a 的image 是个总的radio,可以为从父组件传过来的任意图片,text 为从父组件传过来的任意的文字 icon-ok-image 用来存放选中标志, icon-blank-flag 是个占位的标志。clickevent这个事件使用 this._parent.$emit与父组件进行通信,notify 是自定义的事件类型,后面index 对象是通信的具体细节用来表示具体点击了哪个radio。
单选组件的调用
父组件通过this.$on监听子组件的事件,并设置显示的标志flag 用来控制子组件的选中图片的显示。
1 2 3 4 5 6 7 8 9 10 11 12 13 14 15 16 17 18 19 20 21 22 23 24 25 26 27 28 29 30 31 32 33 34 35 36 37 38 39 40 41 42 43 44 45 46 47 48 49 50 51 52 53 54 55 56 57 58 59 60
| <template> <div class="container"> <div class="box"> <div repeat ="(index,val) in formyas" class="people"> <mya class="item" index="{{index}}" text="{{val.text}}" bgimg="{{val.bgimg}}" flag="{{val.flag}}" ><mya> </div> </div> </div> </template> <style> .box{ flex-direction:row; justify-content: center; align-items:center; flex-wrap:wrap; } .item{ justify-content: center; align-items:center; } </style> <script> module.exports = { data: { header: "选择吃饭人数", btntext:"确定选择", formyas: [ {bgimg:"http://bpic.588ku.com/element_origin_min_pic/16/06/09/1457590684eb27d.jpg", text:"一人", flag:true}, {bgimg: "http://bpic.588ku.com/element_origin_min_pic/16/06/09/1457590684eb27d.jpg", text:"双人", flag:false}, {bgimg: "http://bpic.588ku.com/element_origin_min_pic/16/06/09/1457590684eb27d.jpg", text:"三人帮", flag:false}, {bgimg: "http://bpic.588ku.com/element_origin_min_pic/16/06/09/1457590684eb27d.jpg", text:"多人组", flag:false} ], choosed:{ index:0 } }, created: function() { this.$on('notify', function(event) { var choosedIndex = event.detail.index; this.choosed.index =choosedIndex; for(var i=0,ii=this.formyas.length;i<ii;i++){ if(i===choosedIndex){ this.formyas[i].flag =true; }else{ this.formyas[i].flag =false; } } }) } } </script>
|
所以 由上面的过程就能明白写组件的过程啦。。。。
